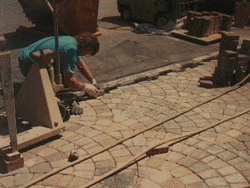
Figure 1 - Installation of paving bricks on a driveway
Additional information on paving bricks and concrete stones.
The following information is intended as an overview to the proper installation of paving bricks and concrete stones. These are the steps that would be taken by a reputable contractor who would be providing a guarantee on the work done.

- The first and a very important step is to have the property surveyed for buried cables, power lines and gas pipes before you start digging. Most utility companies in North America provide location services free of charge. All it takes is a phone call.
- Depending on where you are planning on installing your new paving bricks or concrete stones you may want to have a property survey, as shown in Figure 2, undertaken, if you don't have one.
If you excavate without having the location services flag your property, you will be held responsible for any damages and subsequent repairs. Not to mention the fact that cutting into a buried electrical service or gas pipeline with a shovel could put you out of commission for a very long time. As well, think of the anguish you might create in the community by cutting off utility services to your neighbors.
The primary service companies that should be called are gas, electric, cable TV, telephone, water and sewage.

Figure 2 - Property survey map showing buffers, easement, drainage and setbacks
- Using survey stakes
, as shown in Figure 3, and string, map out the area to be excavated. The more intricate the area, the more complex the installation and cutting of the paving stones.
Most municipalities have setbacks from the road. As well, there may be drainage courses, easements or a right-away for utilities on the front, sides or back of your property.
Expending a lot of energy and/or money installing paving bricks or concrete stones only to find out after the project has been completed that you have encroached on your neighbors property by 6 inches can become a very expensive exercise.

Figure 3 - Survey stake
- Remove any and all existing pavement, sod, plants, and trees from the area to be excavated.
Remember that paving bricks and concrete stones are not flexible and hence tight curves and arches can be difficult to fill.
If you are removing trees or shrubs make sure you either remove the plants entire root system or use a root/vegetation killer, as shown in Figure 4, to ensure that you will not have new growth trying to poke its way through the gaps in your paving bricks and concrete stones.

Figure 4 - Root killer
- Excavate the soil to the required depth. The depth needed is the basic calculation derived from taking the finished surface minus the thickness of the paver, the depth of the setting bed and the depth of the base material. The required thickness of the base material (commonly 4 to 8-inches for patios and walkways and 6 to 12-inches for driveways and roadways) is totally dependent on local soil conditions, primarily the soils reaction to water.
Your city or county soil engineer should be able to tell you the required thickness of the base material for your area.
